What is wonderful for children's creativity is that any object can become its object, well, at least ... linen clothespins! Yes, yes, from the banal and boring wooden linen clothespins it is possible to make wonderful handicrafts, causing admiration and admiration even for the most experienced spectator.
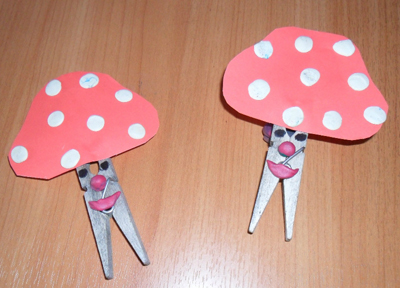
Children's hand-made articles from clothespins "Mukhomorchiki"
We will need:
- clothespin wooden - 2 pcs .;
- colored red paper;
- plasticine white and red.
Manufacturing
- From red paper we cut out the mushroom head, we make on it spots of white plasticine.
- We make from a red plasticine on a leg from clothespins eyes and a smile.
- We glue the head to the stem.
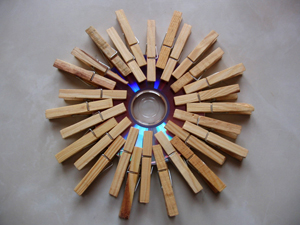
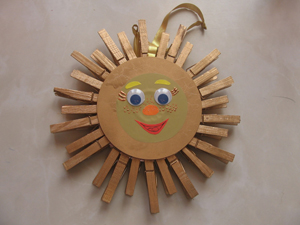
Children's hand-made from clothespins "Sunny"
We will need:
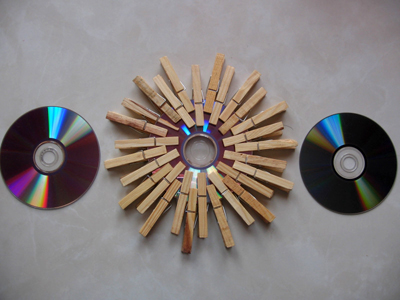
- clothes pegs - 28 pcs .;
- CD-ROM - 3 pieces;
- paint yellow or gold;
- paper;
- glue;
- tape;
- plastic eyes;
- markers.
Manufacturing
- We make rays. To do this, we take one disk and attach its clothespins at different levels throughout its diameter.
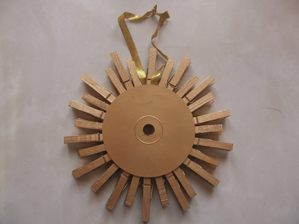
- We pass a tape into the hole of the disc and fix its ends to make a loop. On both sides of the disc with clothespins we glue two more discs.
- We paint our sun with golden or yellow paint.
- From paper we cut out two circles, on one by means of plastic peepholes and markers we represent a smiling face.
- We paste paper circles on both sides of the sun.
| | |
| | |
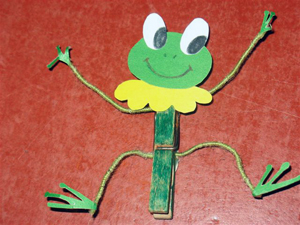
Children's hand-made from clothespins «Froggy»
We will need:
- clothespin wooden - 1 pc .;
- green woolen threads;
- wire;
- colored cardboard;
- colored pens.
Manufacturing
- For the body we will color the clothespin in green color.
- Cut out 2 pieces of wire for the legs, wrap the wire with green woolen threads;
- Cut out the cardboard head, paws, collar, eyes;
- Draw on the head of the frog's mouth and nose, glue the eyes.
- We fix the paws between the halves of the clothespins, we will glue the head and collar to the body.
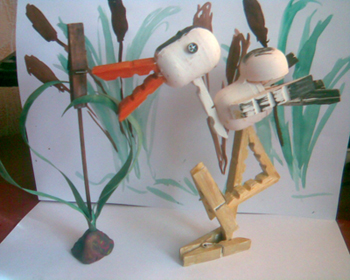
Children's hand-made from clothespins "Heron in the Reeds"
We will need:
- clothespins wooden - 10 pcs .;
- eggs of plastic from kinder-surprise - 2 pieces;
- cardboard,
- plasticine;
- a small stick;
- scissors;
- gouache.
Manufacturing
- We will dismantle the clothespins in part 7, and leave them 3 intact.
- We make the head of a heron, for this we will make two holes in one of the eggs from the kinder-surprise with the help of scissors - for the beak and neck.
- We will make a beak, for this we take one disassembled clothespin and glue its ends with glue. We fix the beak in the head.
- For the neck, take half the clothespins and fix it in the head.
- Let's make a trunk from the second plastic egg. At the bottom of the trunk we will make a hole for the feet with the help of scissors, we will glue the wings on each side - halves of clothespins.
- We'll make a tail, for this we glue the four halves of the clothespins with a fan.
- Let's make our feet. One leg of the heron will be unbent, and the other is bent. For each leg, take 1 whole clothespin and 2 pieces of disassembled. We glue them as shown in the photo.
- We collect the heron, for this we insert the tail into the open part of the trunk, and in the holes we fix the neck and legs.
- Color the heron gouache.
- We'll make reeds. To do this, take a small stick, glue to its lower part carved from cardboard leaves, and at the top we pinch the clothespin. We fix the reeds with the help of plasticine and color it with gouache.
Children's handicraft from clothespins «Racing cars»
We will need:
- clothespins wooden - 3 pcs .;
- furniture nails;
- glue;
- gouache.
Manufacturing