As you know, the lighting in the room plays an important role. At the planning stage, it is important to consider the intensity of the lighting, the size of the chandelier and the number of light bulbs. The larger the room, the more lighting it requires. But there is not always a need for a bright light. That is why for fixtures with five (and sometimes three) and more light bulbs it is recommended to install a two-key switch or two single switches. Connecting the chandelier with their own hands is difficult to call a very complex process, but some knowledge is needed.
Connecting the chandelier through a double switch
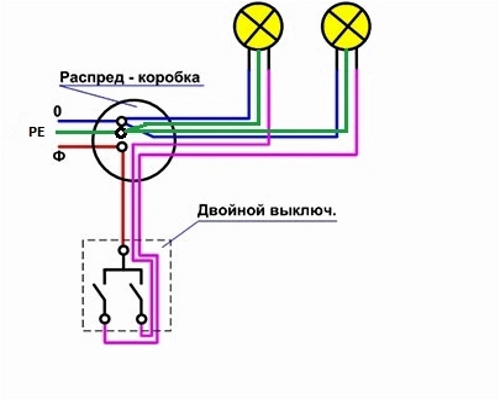
The first and most important thing in connecting a chandelier with a two-button switch - do not forget to turn off the voltage! If your chandelier has three light bulbs, you will find two wires, for a five-lamp lamp you will need three wires already. This will allow you to connect only a part of the bulbs as needed.
An important point is the observance of polarity. Look at the filling: almost always the phase on the terminal is denoted by the letter L, and zero is marked with the letter N. Determine whether the grounding is foreseen, it is possible by the image of the screw on the housing of the luminaire. For a chandelier with several horns, the marking is as follows: L1 and L2 are two separate groups. The scheme of connecting the chandelier through the switch has the following form.
This type of chandelier is connected to 3 wires, since three wires must come out of the ceiling. one of them is zero, the other two are phase ones. After you figure out the wires, you can proceed with the installation and connect the chandelier with a two-button switch.
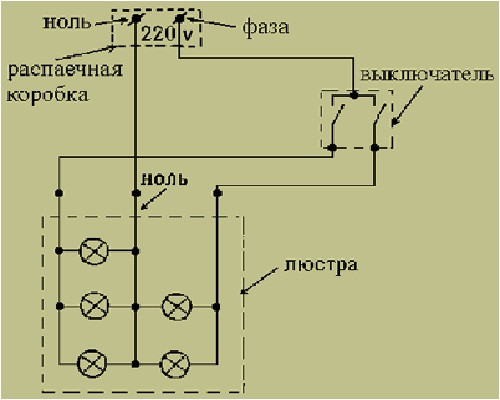
- We turn on one key and put the indicator screwdriver on the prospective wire. As soon as the indicator lights up, the wire with the phase is found. Similarly we find the second phase wire.
- To find zero, look for wires in white, blue or dark colors. Attach a screwdriver: if the indicator is not lit, zero is found.
- Now turn off the voltage and hang the lamp on the ceiling.
- Then connect the zero and phase wires to the same from the junction box. If you find a green wire, look for the same in the junction box and connect. This is the ground wire.
- At the end, we connect all the wires with the clamps of the chandelier.
Connecting the chandelier to two switches
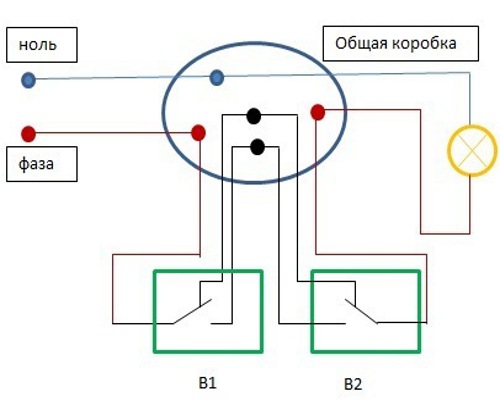
To connect this way you need a special pass-through switch, in which three contacts are provided. The diagram shows how to connect all the elements. The design of such a switch provides three outputs, one directly to the supply medium or a chandelier, the other two to connect the two pass-through switches to each other.
The phase and zero are fed to the junction box, and wires are already connected from it. The phase current is fed to one of the pass-through switches, the other two are connected to each other by a junction box. Zero goes straight to the chandelier.
- Choose the location for the junction box. The circuit for the wires of the switches must be optimal. in this place we cut a hole in the wall and put a box there.
- Next, or make channels for wires in the wall and cover them with putty, or take plastic channels.
- We lay all the wires in the paved channels. Then connect the wires according to the scheme.
- The phase wire from one of the switches is fed to the chandelier last. After all the manipulations we turn on the machines and check the operability.
To connect the chandelier to two switches, copper wires with a cross section of about 1.5 square meters are best suited. mm. Connect wires can be simple twisting, and special clips.