Soon all of us will celebrate the main holiday of the year, in its vestibule we will try to collect a modular origami snake. Even for beginners, such a simple modular snake is quite on the shoulder.
Master class voluminous origami snake
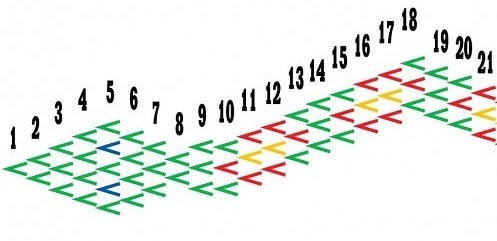
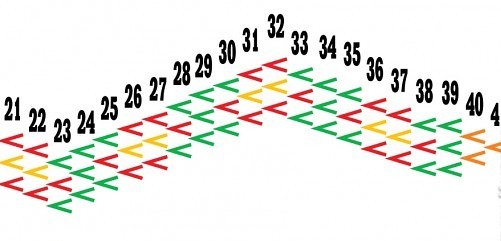
First, let's look at the diagram of this modular origami snake.
| | |
Pre-manufactured triangular modules in several colors:
- 67 green;
- 36 red;
- 12 yellow;
- 3 orange;
- 2 blue;
- 1 red tab.
Now consider in more detail how to collect handmade origami items from modules in the form of a snake:
1. That the work went faster and the design was strong, all modules are attached to each other with the help of PVA glue.
2. Work should begin with the head. According to the modular origami kite scheme, the first row consists of one module, which begins to expand from the second row. For one half of the first row we put the first module of the second.
3. Now you need to add the second module.
4. We continue to expand the snake, as shown in the origami scheme of the modules. To the first module of the second row we attach the first module of the third.
5. Then we put the second module of the third module on both modules of the second row.
6. Add the third module of the third row.
7. As a result we get the appearance of the modular origami from the paper of the snake as follows:
8. Now the fourth row needs to be expanded with the help of four modules.
9. In the fifth row appear the eyes of the snake. There are already five modules.
10. Beginning with the 6th row, we reduce the number of modules to four: for this, the first module of the 6th row needs to enter the entire first and another half of the second module of the 5th row.
11. The next two modules are put in the usual way.
12. For the remaining three "tails" of the 5th row we put the fourth module of the 6th row.
13. On the 7th row, the number of modules must be reduced to four.
14. On the 8th row there should be only two modules left.
15. The 9th row is expanded again with three modules. At this stage of collecting a modular origami snake, you can make a pattern.
16. From the 11th row our snake starts to unfold. Make a shift to the right. To do this, we place the module of the 10th row on the module on the right, as in the case of an extension.
17. The middle module should be put on two ponytails, and the last one - by three. Repeat until the 18th row.
18. On the 19th row the snake moves to the left. To do this, the first module is decreasing, and the second one is put on two tails, the third one by one.
19. Then we work according to the scheme.
20. 39th row without a shift.
21. The 40th row is subtracted: two orange modules for the tail. And already on the 41st row we put one orange module on the two previous ones.