Most often for wall decoration are selected wallpaper . They are very convenient to use, they can even be pasted by a beginner. Decorative plaster is a more complicated process. To independently decorate the walls with this ecological and durable material, you should take advantage of all your accuracy and patience. But such victims justify themselves, because this decoration has many advantages. The operation of the plaster is quite simple, just with a soap solution, you can wipe all stained areas. It is also possible to easily repaint walls if there is a desire to update the interior.
Next, we will tell you how to make textured plaster with your own hands. There are many varieties of textured plaster, they differ in the way they are applied and, of course, with their aesthetic appearance. Often you can find decorative plasters of the type "Rock", "Rain", "Bark beetle" and others in the interiors. We will focus on the most common variant - "Rock", the simplest method of application that exists today.
For the application of textured plaster, we will need the following materials and tools:
- Shpaklevka.Pokupaya in the store, it is better to ask a specialist to calculate the required amount of mixture for your quadrature. And so, as you are new to decorating walls and you will have some overspending of the material, take 10% more.
- Spatulas. It is necessary to take both wide and narrow.
- The trowel has rounded edges.
- Painting bath.
- Flat wide brush for staining (about 20 cm, can be more).
- Pieces of clean cardboard.
Now let's start the technology of textured plaster.
(Figure how to make textured plaster)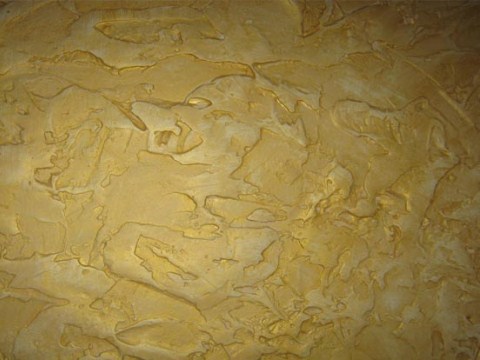
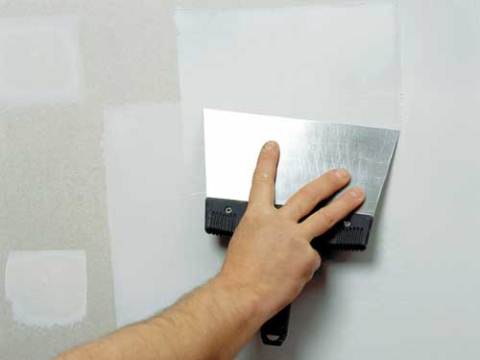
- Preparatory work . Before applying the textured plaster, the walls must be leveled. If you use finely embossed plaster, which does not contain additional elements in the form of pebbles or fibers, then you need to more carefully level the surface. Further, for better adhesion of the plaster and concrete, a primer coat should be applied. Recommendations how to properly knead the primer and how much to apply it, it will be optimally found in the instructions for use, tk. each manufacturer has its own requirements. We also advise you to put a wall in at least one layer, so that in the end there are no surprises in the form of spaces.
- Marking the wall . We will work in small areas, for this we will allocate a certain area, it is possible visually, and it is possible to draw a wall for convenience.
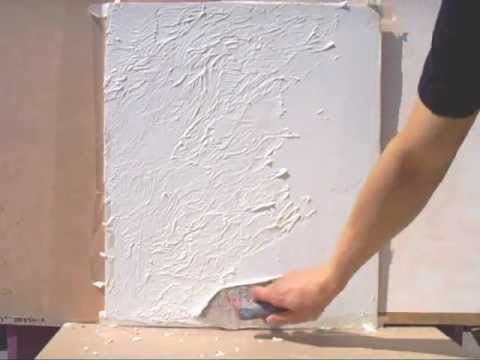
- Preliminary layer. We select a layer of 2-3 mm putty on the trowel and cover evenly one area. The thicker the layer, the rougher the texture of the plaster will look.
- Structuring . Cleaned with a smoothing iron, we take the putty and sculpt it on the wall flat in a chaotic order, only slightly lifting the lower part. At the same time, put your hand aside for 15-20 centimeters. When we sloppily laid out the putty, it already formed voids with air, they give texture, and by making a spatula or smoothing the divorce, we just finish the drawing. The trowel should smoothly and gently move away from the putty, so as not to leave any sharp marks. After the first section, you can proceed to the next, doing this stage until the entire wall is completed.
- Staining . "Rock" dries about a day. After this you can proceed to staining. If you paint a decorative wall in one tone, it will look boring and uninteresting, the texture itself will be lost. Therefore, consider another version of color. Pour a little paint into the tub, we immerse the brush, after wiping it on the tray and on the cardboard. We make so that there is absolutely insignificant quantity of a dye on a brush. And in different directions light movements we paint the protruding parts of our plaster, and it is desirable not to leave traces of the brush.
And after all the work done, you can safely enjoy your own beauty created.