To isolate, an image of a thread, or a nitcography, as an art form first appeared in England. English weavers came up with a way to weave threads on the nails that were hammered into the plaques. As a result, laced lacework was used to decorate dwellings.
Threaded graphics means a graphic image, specially made with threads on cardboard or other solid substrate. Threaded graphics are also sometimes called isographics or embroidery on cardboard. As a base, you can still use velvet (velvet paper) or thick paper. Threads can be ordinary sewing, woolen, floss or others. It is best to use colored silk thread or mulina.
At first glance, it can seem like an incredibly complex technique, but it's not entirely true. To start working, it is enough to master the creation of only two elements - the filling of the corner and the circle.
To get started, you need this:
- a sheet of cardboard or velvet paper on which we will embroider our drawing;
- scissors;
- An awl for piercing holes in cardboard, this will greatly facilitate and speed up our work;
- needle;
- Thread (ideally - a mulina, but others will do);
- ruler, compasses, pencil for drawing diagrams drawings;
- glue, it is used only if you want to duplicate a soft base on a harder surface, and to fix the nodules. You can take glue any - PVA, clerical, wallpaper or "Moment". To fix the thread from the back side, you can use ordinary transparent adhesive tape instead of glue;
- A separate sheet of paper on which the drawings will be drawn.
Embroidery isonization
The thread chart uses two methods - filling the circle and filling the corner. To fill the angle in the technique, the corner should be drawn on the back of the cardboard base, after which each side should be divided into equal segments using a ruler. Beginning needlewomen should number the dots, otherwise you can get lost during embroidery. For convenience, it is worthwhile to use the scheme, which shows the order of introduction of threads. Here is an example of a scheme of embroidering flowers in the isonite technique.
Filling a circle
Filling the circle in the technique is done in this way:
1. Using a ruler and a circular, the circle is divided into equal parts, always in an even number. On the Internet, you can find a huge number of ready-made schemes for embroidery in this technique, but the invented patterns sometimes turn out to be much more interesting.
2. Mark the points on the circle so as not to get lost in the pattern, it is better to number them.
| | |
3. In the marked places with the help of an awl, we make holes, this will save us time, inserting a needle into an already prepared hole.
4. In the case of a circle, the filling is performed along a chord. And in each puncture the needle enters twice - both from the front side, and from the inside. In the diagram, an odd number denotes the occurrence of a thread from the wrong side, even - the entry of a thread from the front side.
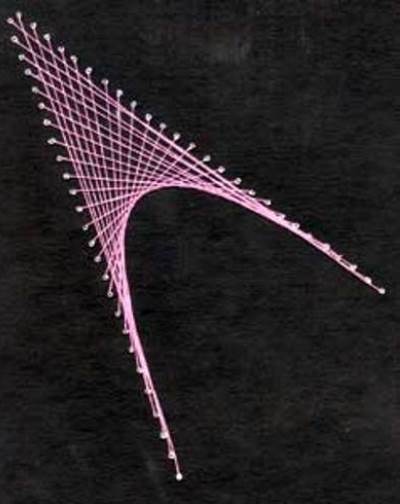
Filling angle
Now we proceed to fill the angle in the technique of isolating:
1. First of all we draw the angle of the size we need.
2. Then each side is divided into equal segments. The number of segments on each side of the corner must be the same.
3. Further we punched holes in the places marked for this. We draw attention to the fact that at the intersection of the sides of the corner, that is, at point 27, the hole is not made.
4. Now embroider this way - from point 26 to point 25, from point 25 to point 2, from point 2 to point 3, from point 3 to point 24 and so on.
| | |
It is worth starting with the simplest schemes and not be afraid of difficulties. Practicing and acquiring even a minimum of experience, you can go to more complex patterns. Having mastered the subtleties of this technique, it is not difficult to sew any picture according to the scheme.