Rarely can anyone resist the temptation to decorate their workplace with a small Christmas tree - artificial or paper. How to make such New Year's crafts, we'll figure it out.
How to make a tree of paper with your own hands?
The most elegant looking Christmas tree made of paper, made in the origami technique, but such a masterpiece is not in everyone's power. Therefore, we will make the herringbone easier, you can connect the children to the process. You will need a pair of compasses, green paper, a ruler, scissors, glue and a pencil (a straw for a cocktail).
- Draw a few compasses on paper, each subsequent one 1-2 cm smaller than the previous one. The size and number of circles, depending on the desired size of the Christmas tree.
- Each circle is folded in half, then again in half and again into halves. At the edges we use scissors to make the fold lines clear.
- Straightening circles - this is the tiers of the future tree. In the center of each we cut out a hole that coincides with the diameter of the pencil (straw).
- We paste a pencil or a straw for a cocktail with green (brown) paper.
- We collect the Christmas tree, stringing all the tiers on a pencil.
- We adorn the top with a star or a beautiful bead. If desired, you can decorate the Christmas tree with sequins.
How else can you make a Christmas tree out of paper?
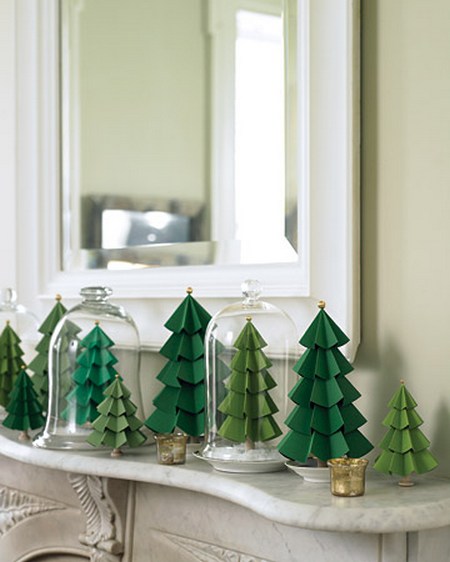
This version of a three-dimensional Christmas tree made of paper is slightly more complicated than the previous one, but the Christmas tree turns out to be charming. Need will be green paper, pencil, scissors, glue, ruler and compasses.
- Draw a circle on the green paper, the size of the lower tier of the future tree. Drawing the inner circle, retreating from the outer slightly more than half the radius. The circle is divided into 12 sectors using a ruler.
- We make an incision along the lines to the inner circle.
- Each sector is folded into a cone and fixed with glue.
- In the same way do the other workpieces, gradually reducing their size.
- We make a hole in the center of each blank with a needle.
- Fold the bottom of the wire with a spiral.
- We gather all the tiers of our Christmas tree on the wire. We fix the cone from the paper on top.
How to make your own hands a tree of paper in a quilling technique?
The openwork fur-tree in the quilling technique will require even more zeal, but those who have heard about the quilling only with the edge of the ear will cope with it. It will take paper strips of green color with a width of 5 mm and 4 strips of 1 cm, yellow and red strips 3-5 mm wide, glue (PVA and instant) and toothpicks.
- We take 4 green stripes of 30 cm, 20 cm, 15 cm and 10 cm in length. We twist them with a toothpick. We remove the part from it and give it a little bloom. We fix the end of the strip with PVA glue. All the spirals are shaped like a drop by grasping and slightly pulling up one of the ends of the spiral.
- Wide green stripes are tightly wound on a toothpick and glue the tip, not allowing to blossom. Of these we will make the tree trunk.
- Make a drop for the top of the spruce from a green strip 30 cm long.
- Now we begin to collect the herringbone with the help of instant glue. We glue the parts of the barrel, let the glue dry out.
- We insert the toothpick into the trunk and glue our droplets-twigs. Starting with the smallest, gluing them up at the top of the Christmas tree.
- From pink and yellow stripes we make toys, twisting the paper without a toothpick. You can fix the ends until the paper is unwound, and you can make the toys a little more free and give them the shape of small droplets. We glue the balls to the liked branches.
- Do not forget to paste a top drop, and decorate it.
- If desired, you can make a stand. For her, you need to make nine curls of white paper strips. Curls tightly glued together. Now we fix the tree on the snow stand with the help of glue.