Nothing gives children more pleasure than joint creativity. Today we will tell you how to make a plasticine dragon. After all, for many boys and girls who love fairy tales, this omnipotent hero is one of the favorite characters. Young lovers of Shrek, Dobryni Nikitich and Snake Gorynych, Hobbit, Tales of the Earthsea, of course, will not be able to abandon the opportunity to have their own, domestic, dragon, having molded it with their own hands.
What are the dragons of plasticine? - Simple and complex. The second option is suitable for more experienced sculptors, and we will talk about a fairly simple method of sculpting a dragon from plasticine.
It will be better if you make two crafts made of plasticine, two dragons. One will be molded in your hands, and the other will be in your child's hands. Then you do not have to explain in words how to make a dragon from plasticine, or to sculpt for a child, as it will be able to imitate what your hands are doing.
How to mold a plasticine from a dragon?
Preparation
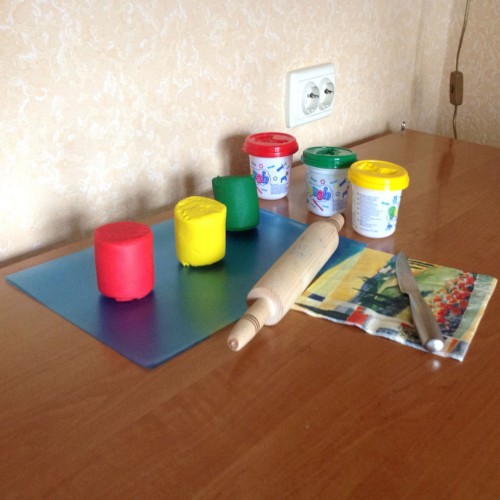
Prepare a plasticine of two or three colors (green, red and yellow), a rolling clay for rolling plasticine, a knife and napkins in order to clean the child's handles in time during operation. Remember that the remnants of plasticine both from clothes and hands, it is better to remove with a dry cloth or napkin, they are not washed off with water.
Step 1
Warm up for pens.Thematic mini-physical exercises are usually very popular with the kids, who start modeling. Before you sculpt a "real" dragon, suggest the child to play it using this pottery.
Who goes there on the mountain, (Palchik "draws" the mountain peaks.)
Breathes in the heat in the dark?
This is a terrible dragon, (fingers are collected in the "mouth" of the dragon.)
He will swallow all the enemies. (Show how the jaws of the dragon open and close.)
Rather off! (Fingers of both hands show how all the "enemies" run away from the dragon.)
Step 2
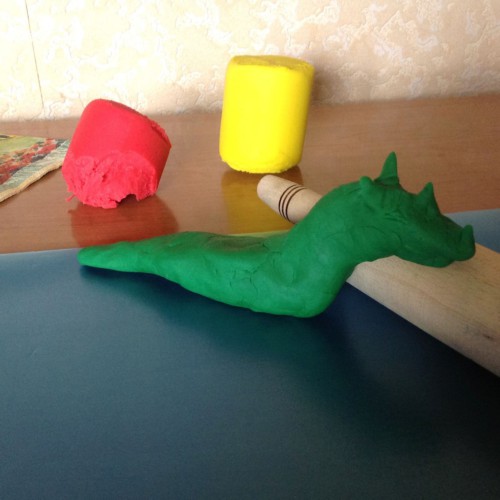
Take a large piece of plasticine green and blinding out of it the torso of a dragon, similar to a snake. Tighten the abdomen of the beast so that it is firm. The head of the dragon should be decorated with horns, which can be molded from plasticine of the same color, from which all the trunk is made. But also for the horns, you can take another color. At this stage, do not forget to "open" the mouth of the snake, since later it will need to place its tongue.
Step 3
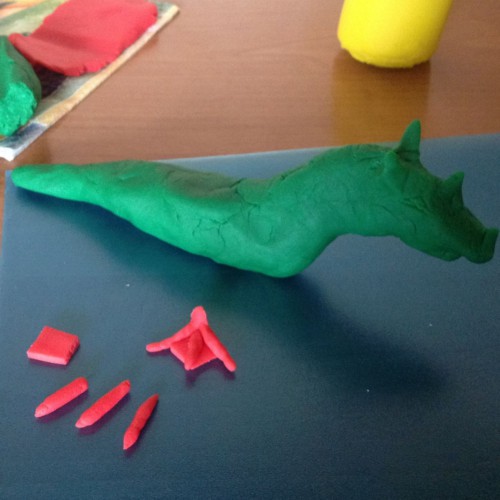
Make the legs for the dragon. To make each of them you will need three thin "icicles" from plasticine of red color and a diamond of the same color (which will serve as a foot membrane). Join the three "icicles" at the bottom and place them on a prepared diamond - that's the leg and ready.
Step 4
Attach both legs to the trunk of the beast.
Step 5
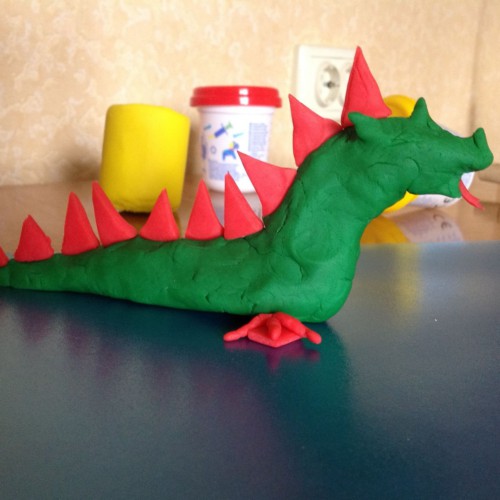
Prepare "prickles" for the back of the dragon. Roll out a thin layer of red plasticine with a scaly knife and cut out small triangles, proportionally suitable to the body.
Step 6
Place the "spines" along the back. Triangles fixed on the tail of the dragon should be smaller than those that go from the head.
Step 7
Again, take the red plasticine and thinly roll it with a rock. Now you need to cut out the wings. Make sure that they are not too long, otherwise, they will not keep their shape and will hang down arbitrarily.
Step 8
Finally, from a thin strip of red plasticine, make a dragon tongue (do not forget to make it bifurcated, like a real snake), and yellow plasticine - bead eyes. Place the last items on the dragon's body.
To improve this model of the dragon, you can add to it a rider and a saddle, in which he will keep during magical flights.
So now you know how to sculpt a dragon's plasticine. Have enough patience for your own child and get to work. Inspiration for you and your baby!