Accessories made by themselves, look very original. Using bright satin ribbons, you can make the most ordinary, unremarkable bezel very beautiful. And if you spend a little more time and patience, you can turn it with your imagination into a real work of art.
For work we need this:
- two satin ribbons, as soon as possible. The main requirement for ribbons - one of them should be light, the other - dark, and their colors should blend well not only with each other, but also with the color of your hair;
- universal adhesive (transparent);
- pair of clothespins;
- scissors;
- lighter.
How to make a bezel from satin ribbons?
We take a bezel 1 cm wide and two ribbons with a width of 0.6 cm and a length of 1.5 meters. If the width of the rim is larger than the one shown in the example, we need to take longer ribbons. For the master class, we took ribbons of dark pink and light purple flowers. These shades perfectly match with each other and will look great on light blond hair. So, let's get to work!
1. From the pink tape cut two pieces of 2 centimeters and glue around the edges of the rim.
2. Take the lilac tape and glue to the outside of the rim, leaving on the left side 3.5 centimeters on the edge winding.
3. Bend the long end of the tape over the rim and glue it lightly in the upper left corner.
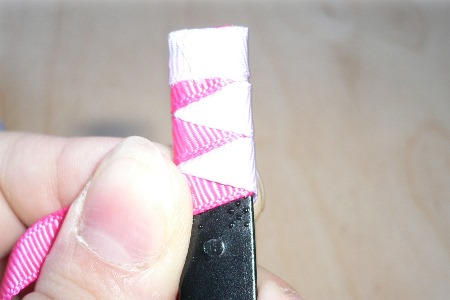
4. We take the first, that is pink, tape and paste, as in the picture, obliquely along the second tape from the inside of the rim.
5. We bend to the pink ribbon the outer side, along the top of the second, that is, lilac, ribbon.
6. Now process the edge of the rim. The short end of the tape (3.5 centimeters) is bent to the inside of the rim over all the tapes and glued.
7. Now wrap the tape on the outside, wrapping the edge of the rim, applying a thin layer of glue under the tape.
8. The end of the tape is fixed with glue on the back of the rim.
9. Take the first ribbon and bend the rim to the inside of the rim under the second ribbon obliquely.
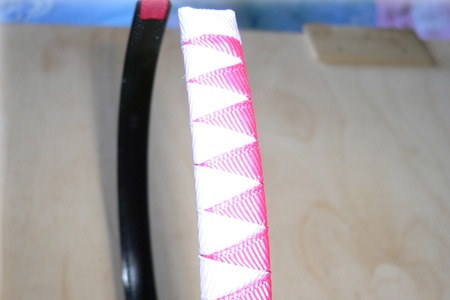
10. From the inside, the bezel looks like this. As you can see, on both sides the picture is equally beautiful and absolutely identical.
11. On the outside we bring up the second tape, the first tape remains below.
12. We have a pattern in the form of small multi-colored triangles. Their appearance will depend on the angle at which the satin ribbons were originally placed.
13. Thus we wind the entire bezel.
14. The second edge is wrapped at the end, just like the first one.
| | | |
15. After finishing the winding almost to the end of the rim, fix it with a clothespin. We measure the same piece of the ribbon, which will go to the edge of the edge and cut off the excess.
16. The second tape is glued to the inner side of the rim, after which carefully cut off. To the tip of the tape is not disheveled over time, gently cauterize it with an open flame, it is most convenient to use a lighter for this, but you can burn candles or a regular match.
17. Then gently wrap the edge of the rim, including its butt, and also glue the tip of the tape to the inside. At the same time, we make sure that it is well stretched, now you can gently scorch its tip.
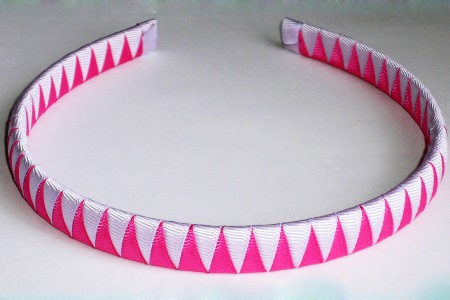
18. That's all, our rim of satin ribbons with his own hands is ready.
| | | |