From salted dough you can do not only some diverse figures, but also large enough pictures. Of course, molding a three-dimensional picture from a salted dough takes much more time and effort, but the result is worth it - such an article decorates your interior or becomes a good gift in the style of hand-made.
Master-class "We make a three-dimensional picture from a salt dough"
- First of all, we cut out of paper or tracing paper a template of the main elements of the future picture - in our case it is swans. Then you need to knead the salted dough, roll it out on a special board, silicone rug or foil and outline the contours of the drawing on the test. This can be done directly through the paper with any sharp object: a needle, a compass, or an awl.
- Next, remove the template and work with the test itself: we guide the main lines, which can be of different thickness and depth. It is convenient to use manicure tools for such work.
- In the place where the wing will be located, for the volume we place a small piece of dough.
- And gently glue the wing into place.
- To glue together the elements from the salted dough is very easy: just use a brush and plain water to do this.
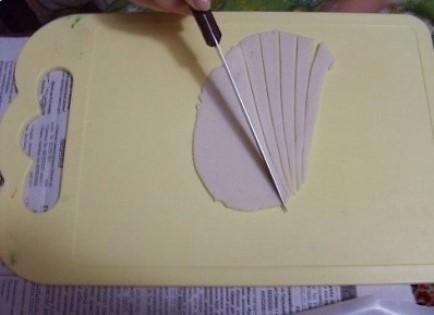
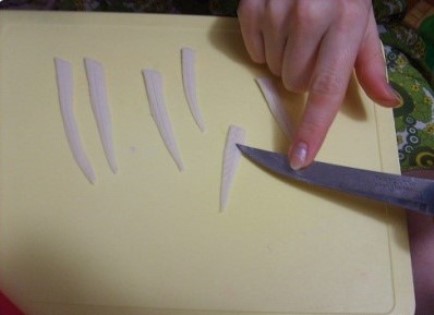
- To make the swan more fluffy, prepare long and short feathers for it.
- Small feathers have the shape of a diamond, and they should be given a fluffy appearance with a knife or a stack for modeling.
- That's how the first swan should turn out as a result of your efforts. Blind from the test two birds that look at each other - for this second swan to be depicted in a mirror image.
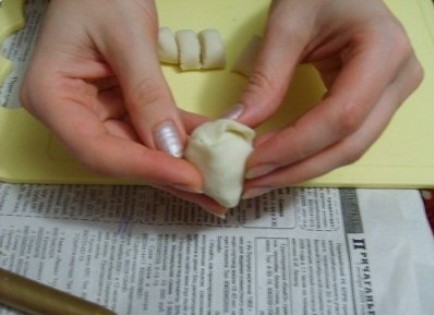
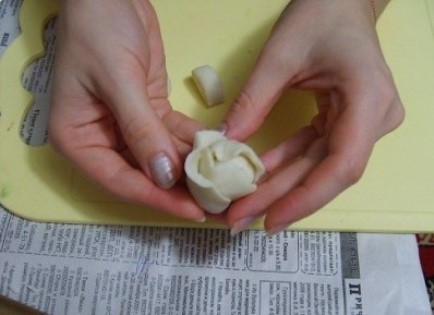
- Let's start making rose flowers for the picture. Roll the sausage out of the dough and cut it into small pieces - there should be as many as the flowers you plan to place on your product. Of course, it is desirable to make an odd number of them.
- We form the middle of the flower by rolling a ball out of the dough and making a deepening in its center (with a finger or a pencil).
- Now we need to make petals - for this we roll out each piece of dough and give it an oval shape with uneven edges.
- Then the center of the flower in turn wraps the petals from different sides, gradually increasing the size of the bud.
- Pay attention to the fact that the more petals, the more magnificent are the roses for a picture of the dough with their own hands. But do not make them too big, otherwise they will look too cumbersome, while the figure of the first plan in this picture should be the swans.
- For the flowers simply cut out the pattern and mark the contours of the characteristic veins on them.
- The long flowers that you see in the picture (later we will paint them in yellow) are made easier: they are molded from small balls of dough, the center of which is pressed by some corrugated object (for example, the back of the pen of the pen).
- And we perform the finishing touches - we make different sizes of carved leaves from the dough.
- All the individual ready-made elements for the picture of the salted dough should first be completely dried in the oven. When they dry, paint them with acrylic paints, gouache or watercolors. If your painting does not fit under the glass, it is desirable to varnish the elements from the salted dough, giving them a glossy gloss. At the end of the work, glue the swans and flowers on the base you have chosen and enclose the picture in a suitable frame.
| | |
| | |
As you can see, making a picture of the test is absolutely not difficult. You can come up with any story for your product and color your work as you see fit.